To recaulk a bathtub, cut out all of the old caulk, clean the joint and let it dry. Then run one steady bead of fresh sealant and tool it within a few minutes. The product sets the wait before the first shower: from 30 minutes in ideal conditions to a full day.
When does tub caulk need replacing?
The bead where a tub meets the wall is a moving joint. That is why sealant makers rate their products by how much joint movement they can take. The caulk has to stay stuck to both sides and stay flexible. Replace it when it stops doing that job:
- it has pulled away from the tub or the tile, leaving a gap you can slide a fingernail into;
- it is cracked, split or crumbling;
- it is stained dark under the surface and the stain does not wash off;
- water shows up on the floor or the ceiling below after a shower.
Dark spots that come back after cleaning can be growth in or under the bead. Sealing over it only hides the problem for a while. EPA’s mold cleanup guidance is blunt: “Do not paint or caulk moldy surfaces. Clean up the mold and dry the surfaces before painting.”
Silicone or siliconized acrylic?
Tub-and-tile sealants come in two main families, and the data sheets make the difference plain.
100% silicone is the waterproof, flexible choice. Movement ratings under ASTM C-920:
- GE Supreme Silicone Kitchen & Bath: Class 50, rated for “± 50%” joint movement (data sheet).
- Gorilla 100% Silicone Kitchen & Bath: Class 35.
- GE Tub & Tile Silicone 1: Class 25.
- Red Devil Kitchen & Bath silicone: Class 25.
The trade-offs: silicone cannot be painted, and uncured smears clean up with mineral spirits rather than water. Once it cures, nothing dissolves it. GE Silicone 1 is an acetoxy type that smells of vinegar while it cures.
Siliconized acrylic is a water-based acrylic with silicone added. DAP lists Kwik Seal Ultra’s base polymer as “Acrylic copolymer”. Red Devil calls its kitchen and bath caulk a “Siliconized Acrylic Emulsion”. These tool easily and clean up with water. Red Devil’s is paintable; DAP’s is not. Movement ratings are lower: the Red Devil sheet gives Class 25 for white and Class 12.5 for clear.
Which to use: for the tub-to-wall joint, where water sits and the gap moves, silicone fits the job. GE calls its Supreme sealant “ideal for areas constantly exposed to moisture”. Siliconized acrylic suits a joint that has to be painted, such as where tile meets a painted wall.
How to remove old caulk and mildew
Every maker’s sheet starts the same way: the old sealant comes out. GE puts it most directly: “There is no substance that will dissolve silicone. If you are reapplying silicone to the area, remove the old sealant, and then clean the area”. DAP asks for a surface “free of all old caulk”, and Red Devil and Gorilla say the same.
- Cut and peel. Slice along both edges of the bead with a utility knife held flat, then pull the strip out. GE’s instructions are to “Remove as much as possible by cutting/peeling/scraping”.
- Lift the residue. On ceramic tile and fibreglass, GE suggests mineral spirits on a non-abrasive pad, tested first on a hidden spot. On hard plastics and painted surfaces, use rubbing alcohol instead: “Do not use mineral spirits”. Both solvents are flammable; ventilate the room and keep flames away.
- Clean visible growth. EPA says to “Scrub mold off hard surfaces with detergent and water, and dry completely” (mold cleanup guidance). Its brief guide to mold does not recommend chlorine bleach as a routine step, and warns never to mix bleach with ammonia cleaners.
- Remove soap film last. Detergent leaves a film that silicone will not grip. GE says cleaning with soap and water “is not recommended as silicone will not adhere to surfaces with any soap scum/residue present”. DAP recommends rubbing alcohol “for removing soap film and soil”. Rinse the scrubbed area, wipe it with isopropyl alcohol, and let it dry.
- Let it dry. GE asks for preparation on the same day, “preferably within 1 – 2 hours before sealant is to be applied, to allow surfaces to dry”. Run the fan and keep the shower off meanwhile.
A homeowner can usually handle a moldy area under about 10 square feet. For larger growth or heavy water damage, EPA points to its fuller remediation guide (mold cleanup guidance). Wear rubber gloves and goggles, and consider an N-95 respirator, as EPA’s brief guide suggests. If the wall behind the joint feels soft or the tile moves, the damage is behind the surface. Have a licensed contractor open and repair the wall before any new caulk goes on.
How to lay a bead that lasts
Size the joint first. Past the product’s limit, press backer rod into the gap so the sealant bridges a shallow joint:
- GE: use backer rod for gaps larger than 3/8 inch deep by 3/8 inch wide. A bead “should not be thicker than ½” (12.7mm) or thinner than 1/8” (3.2 mm), using a width-to-depth ratio of 2:1”.
- DAP: the limit is 3/8 by 3/8 inch.
- Gorilla: backer rod for gaps larger than 1/2 inch.
Mask, cut, and run one bead. GE recommends masking tape along both sides of the joint for a neat line. Cut the nozzle at 45 degrees to the bead size you need, as DAP, Red Devil and Gorilla all direct. Gorilla says to push the bead ahead of the nozzle. GE asks for “a continuous operation” with enough pressure “to properly fill and seal” the joint. That drives sealant into the gap instead of laying it on top.
Tool it while it is wet. GE gives a working time of 5 to 10 minutes, DAP about 5. Smooth the bead once with a gloved finger or a caulk tool, pressing lightly so the sealant wets both sides. GE warns, “Do not over tool or tool too thin.”
Pull the tape after tooling, before a skin forms. GE says the tape should come off “immediately after tooling the sealant and before the sealant begins to skin over”.
Mind the room temperature. DAP and Gorilla both ask for application above 40°F, and GE says its sealant performs best applied at 70°F.
Caulk is the last seal in a wet wall and relies on the membrane and grout behind it. The bathroom remodel planning guide covers those layers.
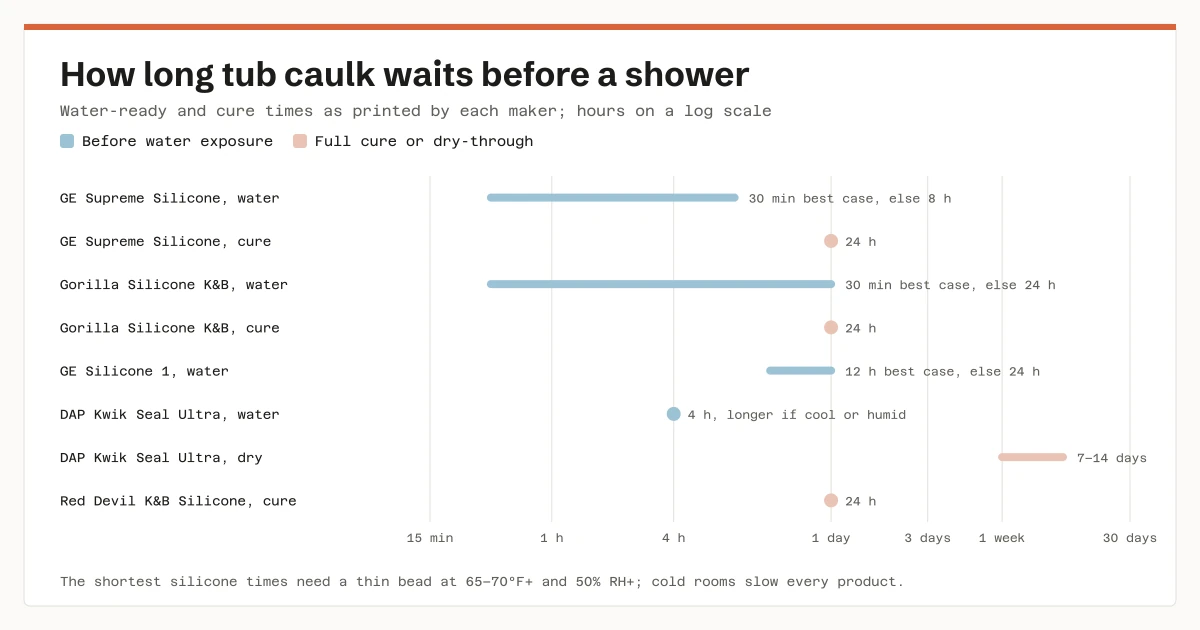
How long before you can shower after caulking?
Each product sets its own wait, and the shortest figure often comes with conditions.
- GE Supreme Silicone Kitchen & Bath: water exposure “possible in 30 minutes” only with a bead no wider than 3/16 inch, at 65°F or above and 50 percent humidity or more. “Otherwise, sealant should not be exposed to water for 8 hours.” Full cure is 24 hours at 73°F and 50 percent humidity.
- GE Tub & Tile Silicone 1: 12 hours under similar conditions with a bead up to 1/4 inch, otherwise 24 hours.
- Gorilla 100% Silicone Kitchen & Bath: 30 minutes for a 3/16-inch bead at 70°F and 50 percent humidity; “Otherwise, wait 24 hours.” Cure time is 24 hours.
- DAP Kwik Seal Ultra: “at least 4 hours (longer in cool or humid conditions)” before water, with full dry-through taking 7 to 14 days.
- Red Devil Kitchen & Bath silicone: no water-ready time is printed; the sheet gives a 24-hour cure.
Caulk after the last shower of the day, and when in doubt use the longer figure on the sheet. GE adds for both its sealants: “Do not touch or clean sealant for 24 hours, or until fully cured.” Its Supreme sheet says the sealant cures about 2 to 3 mm per day from the surface in, at 73°F and 50 percent humidity. So a thick bead takes longer than the headline figure.
Keeping new caulk clean
Once the bead has cured, keep it clean. GE says cured sealant resists staining, but “Regular cleaning of sealant is required however, as soap and other residue can cause secondary mold and mildew growth on surfaces.” EPA’s bathroom advice matches: running a fan or opening a window and cleaning more often “will usually prevent mold from recurring”. Ideal indoor humidity covers keeping the room dry between showers.
Sources
Each source was read on November 5, 2026.
- EPA, Mold Cleanup in Your Home and A Brief Guide to Mold, Moisture and Your Home
- Henkel, GE Supreme Silicone Kitchen & Bath Sealant technical data sheet
- GE Sealants, GE Tub & Tile Silicone 1 technical data sheet
- Gorilla, Gorilla 100% Silicone Kitchen & Bath
- DAP, Kwik Seal Ultra Advanced Siliconized Sealant technical data sheet
- Red Devil, 0836 Series Kitchen & Bath silicone technical data sheet and 0406 Series Kitchen & Bath Siliconized Acrylic Caulk technical data sheet