The most useful kitchen refresh ideas on a budget fix what you touch and look at every day. Change things in the order that is easiest to undo: hardware, then cabinet paint, then lighting, then the backsplash, then the faucet and sink.
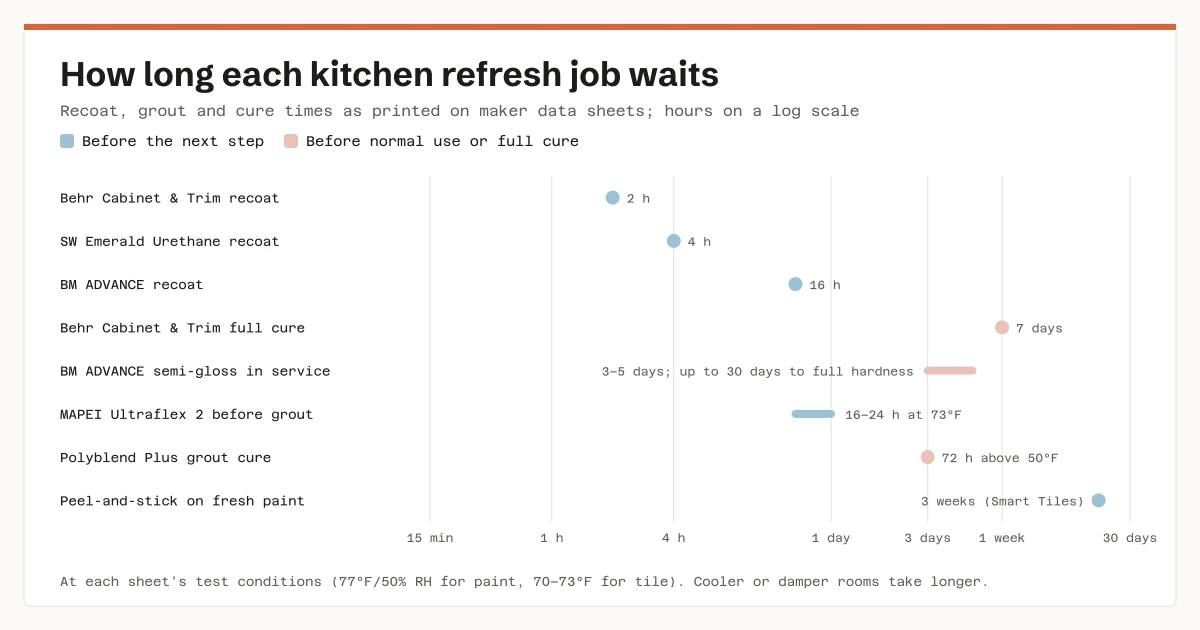
The waits printed on each product’s data sheet set the schedule more than the work does. They run from a 2-hour recoat to a 3-week wait before peel-and-stick tile goes on fresh paint. A refresh becomes a remodel, usually with a permit, once pipes, power lines or walls move.
What should you change first in a kitchen refresh?
Fix a specific annoyance rather than chase a look. Before buying anything, spend a week noting what actually gets in the way:
- a dark counter where you chop;
- a drawer pull that catches a sleeve;
- a faucet that drips or won’t reach the far corner of the sink;
- a splash zone behind the range that never looks clean.
Then sort the list by how reversible each fix is. No source measures the “impact” of a kitchen project, so this guide doesn’t rank by value or return. The order simply runs from changes you can undo in an afternoon to changes that commit you for years:
- Hardware: screws in existing holes, reversible the same day.
- Cabinet paint: reversible only by repainting, and the kitchen is in use around wet doors for days.
- Lighting: bulbs are trivial; hard-wired fixtures may need an electrician and a permit.
- Backsplash: peel-and-stick can come off; set tile is close to permanent.
- Faucet and sink: plumbing connections, with a leak risk if done badly.
If the list includes moving the sink, the range or a wall, skip to the last section first. That changes who is involved.
What size cabinet pulls do you need?
Measure the distance between the screw holes, not the length of the pull. Amerock’s installation guide says size “is determined by measuring from hole to hole, not by the length of the pull itself.” It calls 3 inches “the most common size pull,” and prints a list of common centers from 2-1/2 inches up to 128 mm.
Liberty Hardware makes the same point: center-to-center “is how you determine what size pull you need to swap out existing cabinet hardware.”
Hardware comes first because it sets the drilling. Measure your existing pulls before shopping: matching the spacing means no new holes. If the size changes, Amerock’s guide suggests two fixes:
- reuse one hole (the bottom hole on wall cabinets, the top on base cabinets) and drill one new one;
- cover the old holes with a backplate.
Decide this before painting, because filling and drilling holes belongs in the prep, not after the topcoat. Where to put cabinet knobs and pulls covers placement.
How to prep kitchen cabinets for paint
Cabinet paint lives or dies on prep: clean, rinse, let dry, then sand glossy surfaces dull. The cabinet enamel data sheets agree on the basics:
- Sherwin-Williams Emerald Urethane Trim Enamel: remove contamination “by washing with a appropriate cleaner, rinse thoroughly and allow to dry.” Also, “Glossy surfaces should be sanded dull.”
- Behr Cabinet, Door & Trim: for maximum adhesion on glossy surfaces, “sand the surface thoroughly to provide a rough surface before coating.”
- Benjamin Moore ADVANCE: “Sand glossy alkyds before applying Advance.”
How long does cabinet paint take to dry?
The waits differ a lot between products. At 77°F and 50 percent humidity, the sheets give these recoat times:
| Product | Recoat | Cure or return to service |
|---|---|---|
| Behr Cabinet, Door & Trim (7120 semi-gloss, 7520 satin) | 2 hours | Full cure 7 days |
| Sherwin-Williams Emerald Urethane Trim Enamel | 4 hours | Not stated on the sheet |
| Benjamin Moore ADVANCE semi-gloss (793) | 16 hours | At least 3–5 days before heavy use; up to 30 days to full hardness |
| Benjamin Moore ADVANCE satin (792) | 16 hours | At least 5–7 days before heavy use |
A two-coat job with a primer takes an afternoon of recoat time with one product and two days with another. The cure clock only starts after that. Plan where the doors will lie flat while they cure.
Cooler or damper rooms stretch every figure. Benjamin Moore’s sheet says not to apply ADVANCE at all above 85 percent humidity or below 50°F. How to paint kitchen cabinets walks through the job.
Can you sand cabinets in a house built before 1978?
Test first. In a house built before 1978, the existing finish may contain lead-based paint, and sanding it releases dust. The paint makers print the warning themselves: “If you scrape, sand or remove old paint, you may release lead dust.” EPA recommends hiring a certified lead inspector or risk assessor to test surfaces first. Anyone paid to do the work must be certified in lead-safe practices.
Under the federal rule, sanding counts as “surface preparation activity.” The minor-repair exclusion covers only 6 square feet or less of painted surface per room. A full set of cabinet doors is well over that.
What light bulbs work best in a kitchen?
Start with the bulbs, which need no tools. Lighting changes a kitchen more than its cost suggests. ENERGY STAR’s fixture fact sheet says that “In kitchens, bathrooms, and home offices, brighter light is generally best (1,000+ lumens).” It calls neutral and cool white “Good for kitchens and work spaces.”
Shop by lumens, not watts. The same sheet’s chart pairs a 60-watt incandescent with 800 lumens and a 75-watt one with 1,100. LEDs use “up to 90% less energy” than incandescent bulbs, according to the U.S. Department of Energy’s lighting guide. Lifetime claims differ by document: DOE says “up to 25 times longer,” while ENERGY STAR’s current bulb sheets say 15 times.
Light every work surface. The National Kitchen and Bath Association’s planning guidelines recommend that “every work surface should be well illuminated by appropriate task lighting,” with lighting “from multiple sources and adjustable.” In practice that usually means under-cabinet lights over the counters where you prepare food, on top of the ceiling light.
Do under-cabinet lights need an electrician?
Plug-in under-cabinet strips need no electrical work. Hard-wired fixtures do. ESFI, the Electrical Safety Foundation International, recommends a “qualified, licensed electrician” for any electrical work in the home. If you do it yourself, ESFI says to “Always turn off the power to the circuit that you plan to work on by switching off the circuit breaker in the main service panel.” Then test the wires before touching them.
A fixture swap may still need a permit. ESFI’s summary lists replacing a light fixture among projects that “may” not need a permit, but adding a fixture “where one did not already exist” among those that do. The model building code’s exemption list names “replacement of lamps,” meaning bulbs, not whole fixtures. Check with your local building department before swapping a hard-wired light.
Peel-and-stick or set tile for the backsplash?
A backsplash covers the wall that takes the most splashes and grease, so it changes the look of a kitchen quickly. There are two routes, and they commit you very differently.
Peel-and-stick tile is the reversible one, with limits that are easy to miss. The Smart Tiles installation sheet sets three:
- “Wait a period of three (3) weeks before affixing Smart Tiles on a freshly painted wall.”
- Install at 65 to 95°F.
- Never install it in a shower.
Behind a gas range without a protective rear panel, the sheet asks for “a height of 15 inches (38 centimeters) above the surface” to keep the tiles away from open flame. It also asks for 2 inches from a side wall. The maker’s EU help center gives a different figure, an 8-inch safety zone behind the stove. Use the larger 15-inch figure from the installation sheet.
The sheet also notes that tiles “cannot be reused” once removed. If you are painting the kitchen as well, the three-week wait means the backsplash goes last.
Set tile is close to permanent, and its waits come from the mortar and the grout:
- Thinset: MAPEI’s Ultraflex 2 data sheet gives 16 to 24 hours before grouting at 73°F.
- Grout: Custom’s Polyblend Plus data sheet asks for temperatures above 50°F “for at least 72 hours for proper cure.”
- Any adhesive: the Tile Council of North America’s FAQ says the wait before grouting “is indicated on the adhesive container.”
The same FAQ encourages do-it-yourselfers to tile, and notes that “Tiling a dry area is the easiest.” How to install a kitchen backsplash covers the job itself.
Outlets in the backsplash need their cover plates removed. Box extenders may be needed so the devices sit flush with the new surface. That is work on live devices, so the breaker goes off first, as ESFI’s workbook says. If anything beyond the cover plate needs moving, call a licensed electrician.
Can you replace a kitchen faucet yourself?
A new faucet is one of the few plumbing jobs the makers write for homeowners, and their instructions are short and specific:
- Shut off the water. Moen’s guide starts: “Always turn water supply OFF before removing existing faucet or disassembling the valve.” Then open the handle to relieve pressure.
- Leave room under the sink. For a pull-down model, Moen asks for an 8 by 8 inch clear area for the hose and weight to travel.
- Flush the new faucet for 15 seconds.
- Measure the deck. Another Moen guide uses a support bracket on decks under 1/2 inch thick, so check the sink or counter thickness before buying.
Follow the sheet that comes in the box. Delta’s guide warns that skipping its instructions “may result in personal injury, property damage, or product failure.”
Two labels are worth knowing:
- WaterSense. Federal rules cap kitchen faucets at 2.2 gallons per minute at 60 psi. EPA notes that “WaterSense does not have a specification that applies to kitchen faucets”, so a kitchen faucet sold as WaterSense labeled is mislabeled.
- NSF/ANSI/CAN 372. For drinking water, look for this certification. EPA says it “indicates that a product complies with EPA’s lead free requirements.”
Like light fixtures, faucet replacement is not on the model code’s list of permit-exempt repairs. That list covers fixing leaks only where that does not “involve or require the replacement or rearrangement of valves, pipes or fixtures”. Ask locally.
A sink swap is a bigger job, because the counter cut-out has to match. Kitchen sink materials compares the options. How to fix a leaky kitchen faucet covers repairs, and how to caulk a kitchen sink covers the seal.
When does a kitchen refresh become a remodel?
When pipes, power lines or walls move. The building code draws that line, not the budget. Under the model code text reproduced by the City of Benson, Arizona, “Painting, papering, tiling, carpeting, cabinets, counter tops and similar finish work” need no permit.
Ordinary repairs, though, exclude “the removal or cutting of any structural beam or loadbearing support.” They also exclude any “replacement or relocation” of piping or “electric wiring.” ESFI’s summary agrees that adding wiring or a new fixture usually needs a permit. Local amendments change these lists, so the building department has the final word.
So the plan becomes a remodel when it includes any of these:
- moving the sink, dishwasher or range to a new spot;
- adding outlets or new hard-wired lights;
- moving or opening a wall;
- replacing countertops in a way that changes the cabinet layout.
At that point, plan the layout first. NKBA’s guidelines recommend a work aisle of at least 42 inches for one cook and 48 inches for more than one, and a walkway of at least 36 inches. Kitchen layout clearances covers those numbers. Countertop materials compared and how to seal granite countertops cover the surfaces.
Anything that touches gas lines, wiring or a wall’s framing belongs to a licensed professional. For gas appliances, follow the maker’s installation manual and use a licensed installer. For electrical work, ESFI recommends “a qualified, licensed electrician.” In a pre-1978 home, settle the lead-paint question before sanding or demolition, as EPA advises.
Sources
Each source is listed with the date it was read.
- Amerock, Cabinet hardware installation guide, read November 4, 2026
- Liberty Hardware, What is the difference between overall length and center-to-center of a cabinet pull?, read November 4, 2026
- Sherwin-Williams, Emerald Urethane Trim Enamel product data sheet, read November 4, 2026
- Behr, Cabinet, Door & Trim technical data sheet, read November 4, 2026
- Benjamin Moore, ADVANCE semi-gloss (793) technical data sheet, read November 4, 2026
- EPA, Lead Renovation, Repair and Painting Program, read November 6, 2026; WaterSense kitchen faucets tech sheet, read November 5, 2026; and How to identify lead-free certified drinking water products, read November 5, 2026
- Electronic Code of Federal Regulations, 40 CFR 745.83, read November 5, 2026, and 10 CFR 430.32, read November 5, 2026
- ENERGY STAR, Light fixtures fact sheet, read November 4, 2026
- U.S. Department of Energy, Lighting guide, read November 4, 2026
- National Kitchen and Bath Association, Kitchen Planning Guidelines, read November 5, 2026
- Electrical Safety Foundation International, Home electrical safety workbook, read November 5, 2026
- Smart Tiles, Installation sheet, read November 5, 2026, and Can I install Smart Tiles behind a stove or gas cooktop?, read November 5, 2026
- MAPEI, Ultraflex 2 technical data sheet, read November 5, 2026
- Custom Building Products, Polyblend Plus technical data sheet (TDS-360), read November 5, 2026
- Tile Council of North America, Ceramic tile FAQ, read November 5, 2026
- Moen, Installation guide INS2049F, read November 5, 2026, and installation guide INS10205A, read November 5, 2026
- Delta Faucet, Installation guide 106559, read November 5, 2026
- City of Benson, Arizona, 2024 IRC excerpt, read November 4, 2026